Ajouter le driver pilote natif NVM Express NVMe SSD a l’ISO d’installation Windows 7.
Mettre à jour (boot.wim et install.wim) pour ajouter la prise en charge native de pilotes pour une installation de NVM Express (NVMe SSD) qui utilise le bus PCI Express (PCIe) ou M.2 2280 dans Windows 7 SP1 ou Windows Server 2008 R2 SP1.
Info : Pour démarrer, booter, sur la Clé USB sur les BIOS moderne, il faut :
- Désactiver l’option SecureBoot
- Désactiver UEFI et activer CSM ou Legacy Boot
L’outil de ligne de commande DISM met à jour une image d’installation Windows 7 afin qu’elle contienne des pilotes NVMe
- 1. Telecharger l’ISO Windows 7 x64 ou x86 : Télécharger une Image Système Windows – ISO
- 2. Créez un répertoire de travail temporaire, tel que C:\WIM
- 3. Créez un point de montage C:\WIM\MOUNT et un dossier Update C:\WIM\UPDATE
- 4. Copiez les fichiers image boot.wim et install.wim du dossier sources de l’ISO Windows 7 x64 ou x86 dans C:\WIM (Utilisez 7-Zip pour extraire les fichiers)
- 5. Téléchargez la mise a jour NVMe pour Windows 7 x64 : Windows6.1-KB2990941-v3-x64.msu ou pour Windows 7 x86 : Windows6.1-KB2990941-v3-x86.msu
- 6. Extraire le contenu du Zip (.msu) dans cet emplacement C:\WIM\UPDATE
Ouvrir une Commande CMD (clic droit, exécuter en tant qu’Administrateur)

INSTALL.WIM : IMPORTANT : l’opération complète doit être faite pour les 4 Index (L’exemple ci-dessous est réalisé avec l’index 4)
| Action | DISM command line |
| Mount the install.wim image | dism.exe /Mount-WIM /WimFile:”C:\WIM\install.wim” /index:4 /MountDir:”C:\WIM\MOUNT”
Information : Set /index: to 1 – 4 depending, on the version of Windows 7 you have : |
| Add NVMe update to the install.wim image | dism.exe /image:”C:\WIM\MOUNT” /Add-Package /PackagePath:”C:\WIM\UPDATE″ |
| Commit changes to install.wim image and unmount | dism.exe /Unmount-wim /mountdir:”C:\WIM\MOUNT” /commit |
Refaire l’opération complète pour les 3 Index restant
BOOT.WIM : opération pour l’Index 1
| Mount boot.wim image Index 1 (Windows PE) | dism.exe /Mount-WIM /WimFile:”C:\WIM\boot.wim” /index:1 /MountDir:”C:\WIM\MOUNT”
Information : Set /index: to 1 – 2 (1 pour Windows PE – 2 pour Windows Setup) |
| Add NVMe Update to boot.wim imag | dism.exe /image:”C:\WIM\MOUNT” /Add-Package /PackagePath:”C:\WIM\UPDATE″ |
| Commit changes to boot.wim image and unmoun | dism.exe /Unmount-wim /mountdir:”C:\WIM\MOUNT” /commit |
BOOT.WIM : Opération pour l’Index 2
| Mount boot.wim image Index 2 (Windows Setup) | dism.exe /Mount-WIM /WimFile:”C:\WIM\boot.wim” /index:2 /MountDir:”C:\WIM\MOUNT”
Information : Set /index: to 1 – 2 (1 pour Windows PE – 2 pour Windows Setup) |
| Add NVMe Update to boot.wim imag | dism.exe /image:”C:\WIM\MOUNT” /Add-Package /PackagePath:”C:\WIM\UPDATE″ |
| Important | Trier manuellement le dossier « C:\WIM\MOUNT\sources » par date et puis copiez les 58 fichiers mis à jour dans le dossier « Sources » de l’ISO Windows 7 |
| Commit changes to boot.wim image and unmoun | dism.exe /Unmount-wim /mountdir:”C:\WIM\MOUNT” /commit |
- Créer une clé USB amorçable de l’ISO Windows avec Rufus (Portable Version) ou Rufus 2.18p – Site du concepteur : Rufus
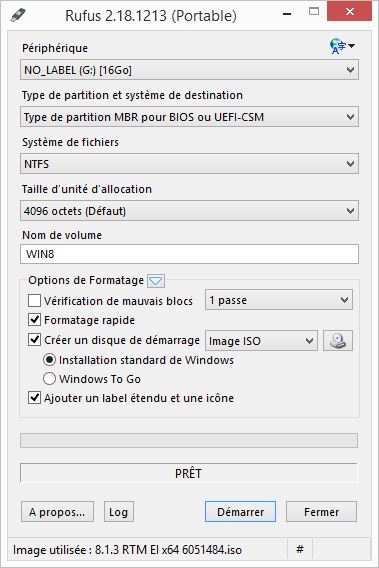
Information : PC avec BIOS UEFI, sélectionner : Type de partition GPT pour UEFI
- Remplacez les fichiers modifiés BOOT.WIM et INSTALL.WIM dans le dossier Sources de la clé USB
Information : Pour modifier directement l’ISO, utilisez UltraISO